Soil Analysis

We’ve talked here before about Steve Solomon’s books on gardening.  We love Steve, and especially appreciate the book The Intelligent Gardener: Growing Nutrient Dense Food.  We actually pre-purchased this book a month before it was released.  As soon as it arrived, we read it cover to cover.  This book explains in easy to understand terms the science behind agronomy and applies it to the backyard garden.  But it goes a lot further than that.  There are links to a website where you can download worksheets to help further analyze your soil results.  And then there is also a yahoo chat group you can join.  Steve hangs out on the forums and helps to answer questions.

Lab reports often come back with recommendations on the traditional NPK (nitrogen, phosphorus and potassium) and also calcium.  The problem is that your soil is more complex than that.  These worksheets will help you figure out your needed (if any) amounts of Sulfur, Magnesium, Sodium, Boron, Iron, Manganese, Copper and Zinc.

All of these are important to bring you soil into proper balance in order to produce optimal nutrition in the food you are producing.  The author’s way of describing this is by looking at an old barrel with vertical wooden staves.  That barrel will only hold it’s full potential if each of the staves are full in length, going all the way to the top.  If a few of those staves are shorter, only going halfway up the barrel, then the barrel will only hold as much water as it’s shortest stave would allow.

Here are our results in a PDF:  2016 Soil Sample Trends

The most alarming thing that I see when looking at the report is that our organic matter percentage has been slowly decreasing.  I intend to fix this by trying out a heavy layer of straw mulching.  I predict this should do two things: 1. it will help retain water, allowing the plants to grow more easily with less water input.  More root growth should help increase organic matter.  2. turning under that straw mulch should help incorporate a lot of organic matter into the soil.

The other thing I plan on doing this year is using more fertilization than I have in the past.  I usually use fishmeal at planting time, along with my home made compost.  And that’s it.  Nothing else for the year.  But this season I will try to make a tea with the fishmeal and then apply that to everything once every 3-4 weeks or so during the entire growing season.

Based on the calculations, the main amendment we’re adding this year is 1320 lbs per acre of gypsum.  This is the only amendment we’ve added for several years now and have seen it lower our pH and also reduce some of our overages in Phosphorus, Potassium, Magnesium and Calcium.  I know, it does seem weird to be adding calcium in order to reduce calcium.  You’ll learn in the book that calcium is a key to unlocking and accessing these other elements.  The extra calcium allows the plants to consume and therefore reduce the excesses.

Have you been doing soil tests for your garden?  Have you seen good results?

Thanks, Robert.

Best Sprouted Wheat Bread

Courtney has found the best sprouted wheat bread recipe.  It is from her King Arthur Flour Whole Grain Baking book.  The recipe we’ve settled on is on  page 185.

We buy whole wheat berries in 50 pound bags from a local buying group that pulls together bulk orders twice a year.  We use a Nutrimill to do the grinding and a Bosch mixer to do the kneading.  The Bosch is a breeze to work with.  Handling 5 loaves at once, it is a definite upgrade from the KitchenAid Artisan that Courtney wore out making bread.

So why should we sprout our grains?  Through the process of sprouting, a grain unlocks tons of nutrients that are used in the growing process.  These nutrients are more available to the human body by doing this and can provide a lot of immune system support.

There is a downside to this.  You will NEVER be able to eat store bought bread again.  This bread it soooo good that it will instantly turn you into a bread snob.  But you will be a healthier bread snob as a result.

Happy baking.  Robert.

You can do hard things

I’ve always been one to gladly accept a challenge.  And I don’t mind getting way in over my head, either.  Becoming submerged on a project forces one to learn because you get outside of your comfort zone.  In the end, you end up gaining knowledge, proficiency and confidence.  And of course, you’ll save some cash too, by fixing things yourself rather than calling a repairman.  I encourage this for everyone.

Here’s a few examples of things I fixed during the last year:

  • repaired oil leak and replaced the high pressure oil pump on my Ford truck’s 7.3 liter powerstroke diesel engine
  • replaced the axle in our Honda Odyssey minivan
  • rewired our Whirlpool electric clothes dryer
  • fixed the Kenmore freezer when it died
  • replaced the Frigidaire dishwasher heating element
  • replaced several old windows in the house

To people that have done this before, these things sound easy, because they’ve been there and done that.  However, I can recall my own apprehension before each of these projects.  I wondered if I was going to get in there and cause more damage than was already present.  I wondered if I could even fix it.  I knew it could more expensive for a repairman to finish a half done project than it was to do it from the beginning.

How do you do it?  First, start small. If you have no automotive aptitude, then start by doing the easy stuff like changing oil and rotating tires. You will slowly gain familiarity with how stuff works and where things are located.  Slowly amass your own tool collection.  Use resources like a Haynes manual or the internet.  For my truck, I use http://www.powerstroke.org a lot and for the van http://www.odyclub.com.  If we’re talking appliances, I use http://www.davesrepair.com.

It does help to talk through things with someone else.  I have a friend locally that I talk to about stuff.  I also call my uncle Dave.  He knows that if his phone is ringing, I’m knee deep in something bad and need some advice.  Feel free to reach out to me via the blog.  I definitely don’t have all the answers but I may be able to point you in the right direction.

And the other answer to “how do you do it?”  Jump!  You just have to try it.  I often learn more from my failures than from my successes.  Don’t be afraid to make a mistake.

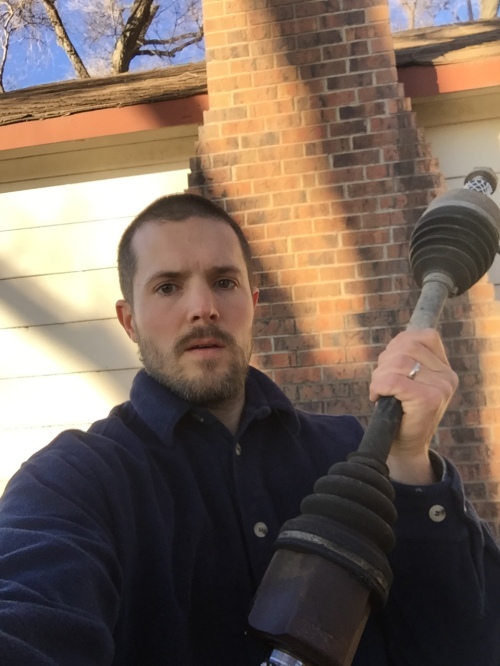
axle pic

Here I am after replacing the van axle.  While that may sound like a great accomplishment, it took less than an hour.  Once disassembled, it pops into place with minimal effort. 

Thanks, Robert.

The 2015 Irrigation Update

In the past, my irrigation articles have gotten a lot of interest, so I’m writing today to share some of my more recent developments on the topic.  Click Here and here to link back and check out the older ones again.

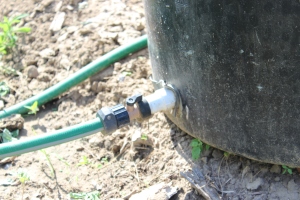
Originally, I was using JB Weld to make the pipe to barrel connection.  That really didn’t work because it was too brittle.  The joints were constantly breaking and then the water would leak out of the barrel.  And yes, I tried using even more JB Weld, gooping on a large amount and making a wide base.  It just never worked.  Below is a picture of my latest iteration:

041

Drip Irrigating from a 55 gallon barrrel

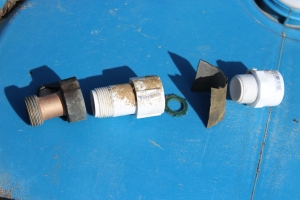
Some plumbing supplies are required.  Below is an exploded view:

040

Drip Irrigation Supply Line connection to 55 gallon barrel

The PVC fitting on the right is inserted through the 1″ hole from the inside of the barrel.  Its kinda tricky to do.  I use a long flexible wire that I feed in through the bung, and then out the 1″ drilled drain hole.  Then put that fitting on the wire and it slides down to the hole.  Insert your pinkie into the threaded fitting to pull it through the hole until enough thread is showing on the outside that you can put your gasket on and then thread on the second, longer PVC fitting.

The gasket is the second item from the right.  It is a section of tire inner tube that I cut down.  Use another of your fittings to trace a circle at the center of the inner tube and then carefully cut it out.  Don’t do a sloppy job on this part, if you do, you’ll end up with leaks.  The gasket needs to seal all the way around.

Next item in the picture is a hose washer.  Insert that into the female threads on the longer PVC fitting.  Then screw them together.

Once you’ve got it fairly tight, you’ll notice that the fitting on the inside of the barrel is spinning as you tighten.  You’ll never get it tight enough to prevent leaks unless you can hold that internal fitting still.  I solved that problem by duct taping a medium sized crescent wrench to the end of a hoe handle.  You can then lower the crescent wrench through the bung to reach the fitting from the inside.  The fitting has a hex flange on it which makes this possible.  Now you can tighten the two down.

Last,  I install a brass valve on each barrel.  This allows you to shut off the supply line in case you need to repair drip tapes, etc.  Or you could also do your irrigating, then fill the barrels again and shut of the valve.  When its time to irrigate tomorrow, the barrels are all full and ready to go.  This could help you out when you know you’ll be in a hurry the following day.

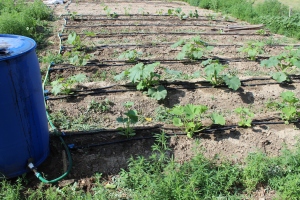
We’re currently running 11 barrels like this, each providing water to a 600 square foot area.  Here’s a picture of the completed setup on my squash patch:

Drip Irrigation

Drip Irrigation

Do any of you have a similar setup that works for you?  I’d love to hear about it and compare notes.

Thanks, Robert.

The 2015 Livestock

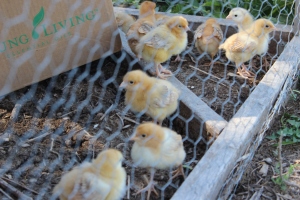
We’re having so much fun with our new baby chicks and our piglets.  We got fifteen medium growth broiler chicks.  We prefer the medium growth because the fast growth chickens just get too fat too fast.  It seems unnatural and the full grown chickens seem uncomfortable.  The slower guys live more like a chicken should, in our opinion.

Medium Growth Broiler Chicks

Medium Growth Broiler Chicks

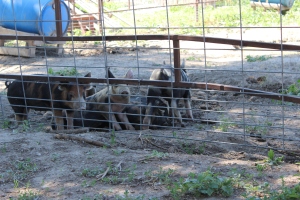
The piglets we got are either Duroc or Hampshire crossed with a Berkshire boar.  We love the flavors we get from Berkshires and we’re thrilled to be raising them again this year.  We keep one for our family to eat and sell the rest.  In the past, we’ve gotten the most compliments from Berkshire meat.

Duroc and Hampshire crossed with Berkshire boar

Duroc and Hampshire crossed with Berkshire boar

In addition to the above, we have about 30 laying hens which are a mixture of Red Star, Americauna, Speckled Sussex and Black Australorp.  All were chosen for their cold hardiness.  We’re pleased with the egg production as well as the foraging ability of these types.

Have you had similar experiences with these breed selections?

Thanks, Robert.

Become a Weather Spotter

I love weather and always have.  Courtney found out that our local National Weather Service office holds Spotter Training classes, and so I attended one last April.  After a couple hours of lecture and slide shows, you can become a certified storm spotter, too.

Especially useful for those in tornado prone areas, you’ll learn about the important characteristics of a storm that has the potential to generate a tornado.  This is helpful to identify danger, and just as useful in knowing when not to be concerned.  Much anxiety can be eliminated with this knowledge.  This information is important to the homesteader not only for  personal safety but also for your plants and animals.  Knowing conditions are ripe for hail, you can cover sensitive plants and ensure animals have a roof to get under.

Here’s the link to my local NWS spotter training schedule:  http://www.crh.noaa.gov/bou/?n=spot_training

With my training, I was able to identify and report a wall cloud with a rotating updraft last spring.  I couldn’t quite call it a funnel cloud, but I called the local NWS office anyways.  As a spotter, you are provided with a direct line to the meteorologist desk.  They issued a tornado warning as a result of my call.  The cloud never did worsen or touch down, thankfully.

I highly recommend this free class to anyone with an interest in the weather.  Navigate to the National Weather Service webpage for your local area to see if they offer these classes, too.

Are you a spotter, too?  Or do you have a great story?  Leave a comment, I’d love to hear it.

Thanks, Robert.


Young Living Essential Oils

Has anyone been wondering what the heck we’ve been up to? It has been quite some time since we put a post up here. Our homestead has kept us very busy. We have also been working on a new income source.

Courtney purchased a Young Living Essential Oil Starter Kit last spring so that we could make our own bug sprays. We quickly discovered that the oils can do so much more, from relaxation to supporting normal healing, from promoting healthy sleep to revitalizing healthy skin.  We have a saying in this house “there’s an oil for that…”

Young Living has adopted a business model that empowers their customers to be the sales force by offering a commissions to share about products they love. Sharing is a natural result when you love the oils.  Courtney has been doing this for the last 6 months or so and it helps provide some extra money for our family. For those willing to work hard and do what it takes, it can be very rewarding.  Hearing your friends say “I’ve had the best sleep of my life” is extremely gratifying.

If you are looking for a home based business opportunity with great income potential, check out the Young Living essential oils tab at the top menu bar. Courtney has provided some details on how to get started.

If you are just interested in essential oils and don’t want to be bothered by the business side of things, that’s OK. There is no continuing obligation after the first purchase.

We would also love to hear from you if you have questions or would like to know more, or even if you already use essential oils.

Thanks,
Robert

Installing your woodstove

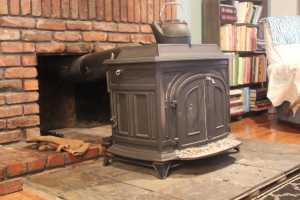
Our Vermont Castings Vigilant was installed October 2012 and we put in a solid winter of heating with it.

Vermont Castings Vigilant

It occurred to me that the installation was rather difficult, not because of any construction or fabrication complexity, but rather because information on the topic was hard to find.  For that reason, I wanted to share with you how I went about our installation.

One of the better resources I used was the Hearth Forum.  On the message boards at that site, I was able to locate and download the original user manual and installation manual for the Vigilant.  The manual did not immediately address my unique situation, however.  My uncle probably had the best advice at this juncture, paraphrased “You’re an intelligent person.  Research it to the best of your ability and then just do it.  Try it out.  Don’t worry about explaining to a home owners insurance inspector.”

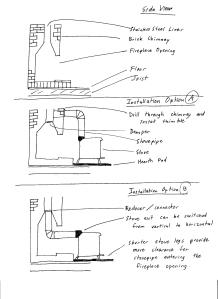
That was all I needed to hear, because I was suffering from analysis paralysis.  I’ve drawn a picture to show what my unique situation looked like:

Woodstove Installation Options

As you can see, we were starting with a chimney that contained a fireplace insert and had a 10″ stainless steel flue liner.  I removed the insert and wanted to install the wood stove.

Option A was what I considered the traditional setup, with the stovepipe exiting the stove vertically.  That is how my dad had ours set up.  This installation would have required drilling out some of the brick, installing a clay thimble (absolutely no one I talked to confirmed that these things even exist anymore) and then putting a damper below the spot in the existing chimney where the thimble connected.  I had no idea how I was going to connect the clay thimble (or even a stovepipe instead) to the liner in the chimney because it would have been near impossible to reach inside there.

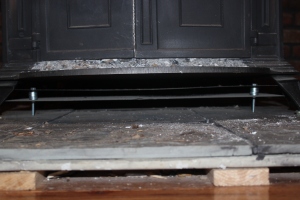
Option B seemed easier and would also leave the attractive brick chimney intact.  A reducer was needed to connect the 8″ stovepipe from the stove to the 10″ chimney liner.  This also required that we shift the stove’s pipe exit to the horizontal position.  The main problem was this: the stove was too tall.  The exit pipe was taller than the fireplace opening.  I fixed this by purchasing some shorter legs for the stove and also by redesigning the hearth pad to minimum thickness.

The original plan for the hearth pad was to use the 3’x5′ Durock cement board set on some furring strips and then make a brick base to match the color of the existing chimney and also match the height of the lip in front of the chimney.  Instead, I started with the same cement board and furring strips, but laid some nice looking slate tiles down that were only 1/2″ thick.  Because I was using shorter legs on the stove I also constructed my own heat shield to sit under the stove using some 24 gauge sheet steel found at Lowes.  Now you can put your hand on the slate directly underneath the stove when you’ve got a rip roaring fire going.

Hearth Pad and Heat Shields

Starting at the bottom, you see the floor, followed by furring strips, Durock, slate, two layers of heat shields and then the bottom of the stove.

Even with this shorter hearth pad and shorter legs on the stove, the exit pipe still had a slight downward slope.  I was worried about that, because I’ve never seen smoke flow downhill.  Another chat with my uncle about this brought my confidence back.  Get those pipes hot, creating plenty of draft, and that exit pipe will never be a problem.  He was right.

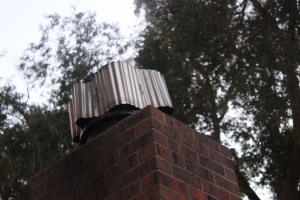
That doesn’t mean we never experienced problems.  Ha!  Boy did we have problems!  Thanksgiving 2012 was very windy and we had a house full of family.  The wind came from a direction where it seemed to blow directly down our chimney, filling the house with smoke.  That made for a rather stressful day and would have been fine if it was a one time occurrence.  My quick remedy was to fill the stove with paper and small sticks to make an intense fire and get things really hot.  That definitely worked, but didn’t solve the problems at night when you shut the dampers.  Unfortunately this happened many times before I was able to fix the problem by treating the source rather than the symptoms. Dismayed at the prices of these fancy stainless steel wind proof chimney caps, I decided to make my own by tying some scrap sheet metal to my existing chimney cap with tie wire.  That, combined with filling any and all seams on the stovepipes with furnace cement meant that we didn’t have any more trouble with smoke in the house.

DIY Windproof Chimney Cap

In conclusion, I must say I’m very happy with this stove.  We only spent a couple hundred dollars on propane heating our home last winter, where our neighbors spent thousands.  Gathering firewood is a lot of work, but to me is enjoyable and part of what I call my country boy’s gym membership.  Most of the wood I have is found free by cleaning up neighboring properties.

Thanks, Robert.

The dog proof compost pile

We recently harvested broilers and turkeys.  What doesn’t go into the freezer goes into the compost pile, such as innards, feathers, etc.  I bury this stuff in a large pile of wood chips.  The wood chips do a great job of absorbing everything during the decomposition process and we humans never smell anything.  But the dogs obviously do and they would love to get their paws on some three week old rotted chicken heads.

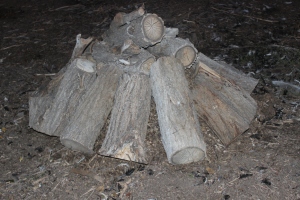
Our german shepherd especially enjoys these treats.  He’ll dig into that compost pile like it is a big birthday present.  I decided to head this one off at the pass this year, by piling up some large heavy firewood pieces all around the compost pile once it was constructed.

The Dog Proof Compost Pile

I was not all that surprised the next morning to find that our pup had found the smallest, lightest piece and pulled it away to expose the pile.  He was able to score a delectable turkey foot.  I raked everything in again, and replaced the piece of wood with a larger, heavier one.  So, despite that small setback, I still stand by this idea.

Thanks, Robert.

Chilton vs Haynes

No, we’re not talking about underwear here.  A Chilton Manual and Haynes Manual are two brands of automotive manuals that show you how to do absolutely everything on your vehicle.  Complete tear down of all parts of the vehicle are clearly documented via photograph and text.  They are an excellent resource for anyone that intends to make repairs at home.

The main point is this: pick one and get on with it.  Doesn’t matter which manual you use, just make sure you’ve got one.  I chose Haynes simply because that is what they had at Autozone on the day I decided to buy one.  I had a friend that worked on trucks with me at age 16 that always used Chilton.  I really don’t think there is much difference.

These manuals will also provide you with a better maintenance schedule that what is found in your vehicle’s owner guide and also show you how to do it all.  I was glad to have it recently, because I just got done replacing transmission fluid and filter, coolant and hoses and also the serpentine belt on my 2000 F350 Powerstroke.  We also have a 2006 Honda Odyssey and I plan on replacing the timing belt this fall.  I’ve already read over the manual for that.  It sounds a bit more involved of a project that I would normally be comfortable with, but here is the perk: Honda also knows that I should probably be doing this soon and I received a coupon in the mail.  They offered to give me a deal and replace the timing belt for $485.  A quick check at Autozone’s website revealed that a timing belt costs $29.99!  Yes, I’ll be doing this one on my own and keeping that leftover $455 in my pocket, thank you very much!

Thanks, Robert.